Key points:
- WooCommerce has Classic Checkout (PHP) and Checkout block (React), each with different customization methods.
- Add/remove fields via settings, plugins, or custom PHP code, with plugins offering no-code solutions.
- Advanced Custom Fields (ACF®) lets you visually define and manage custom fields for checkout with minimal code.
- ACF works for backend data in Block checkout but requires integration with Block APIs for frontend display.
With 4.5 million stores using WooCommerce, a lot of revenue flows through its checkout forms.
Friction at that final step is where you lose people.
Research backs this up: according to the Baymard Institute, around 18% of people abandon checkout because it feels complicated, and most stores request more fields than they actually need.
WooCommerce ships with sensible defaults like billing, shipping, and order notes, yet stores often ask for more information than customers care to provide. Removing fields that serve no purpose and rewriting unclear text helps shoppers move forward with less friction.
Our goal here is to make it easier for your customers to finish paying without guessing what you want from them.
Understanding WooCommerce checkout: Classic vs Block
WooCommerce offers two checkout systems that behave differently.
The older setup, often called Classic checkout, runs through PHP templates and shows itself whenever a page contains the [woocommerce_checkout] shortcode. This version accepts traditional code snippets and many long-standing tutorials still reference it.
WooCommerce might even give you the option to switch to the Checkout block in one click:
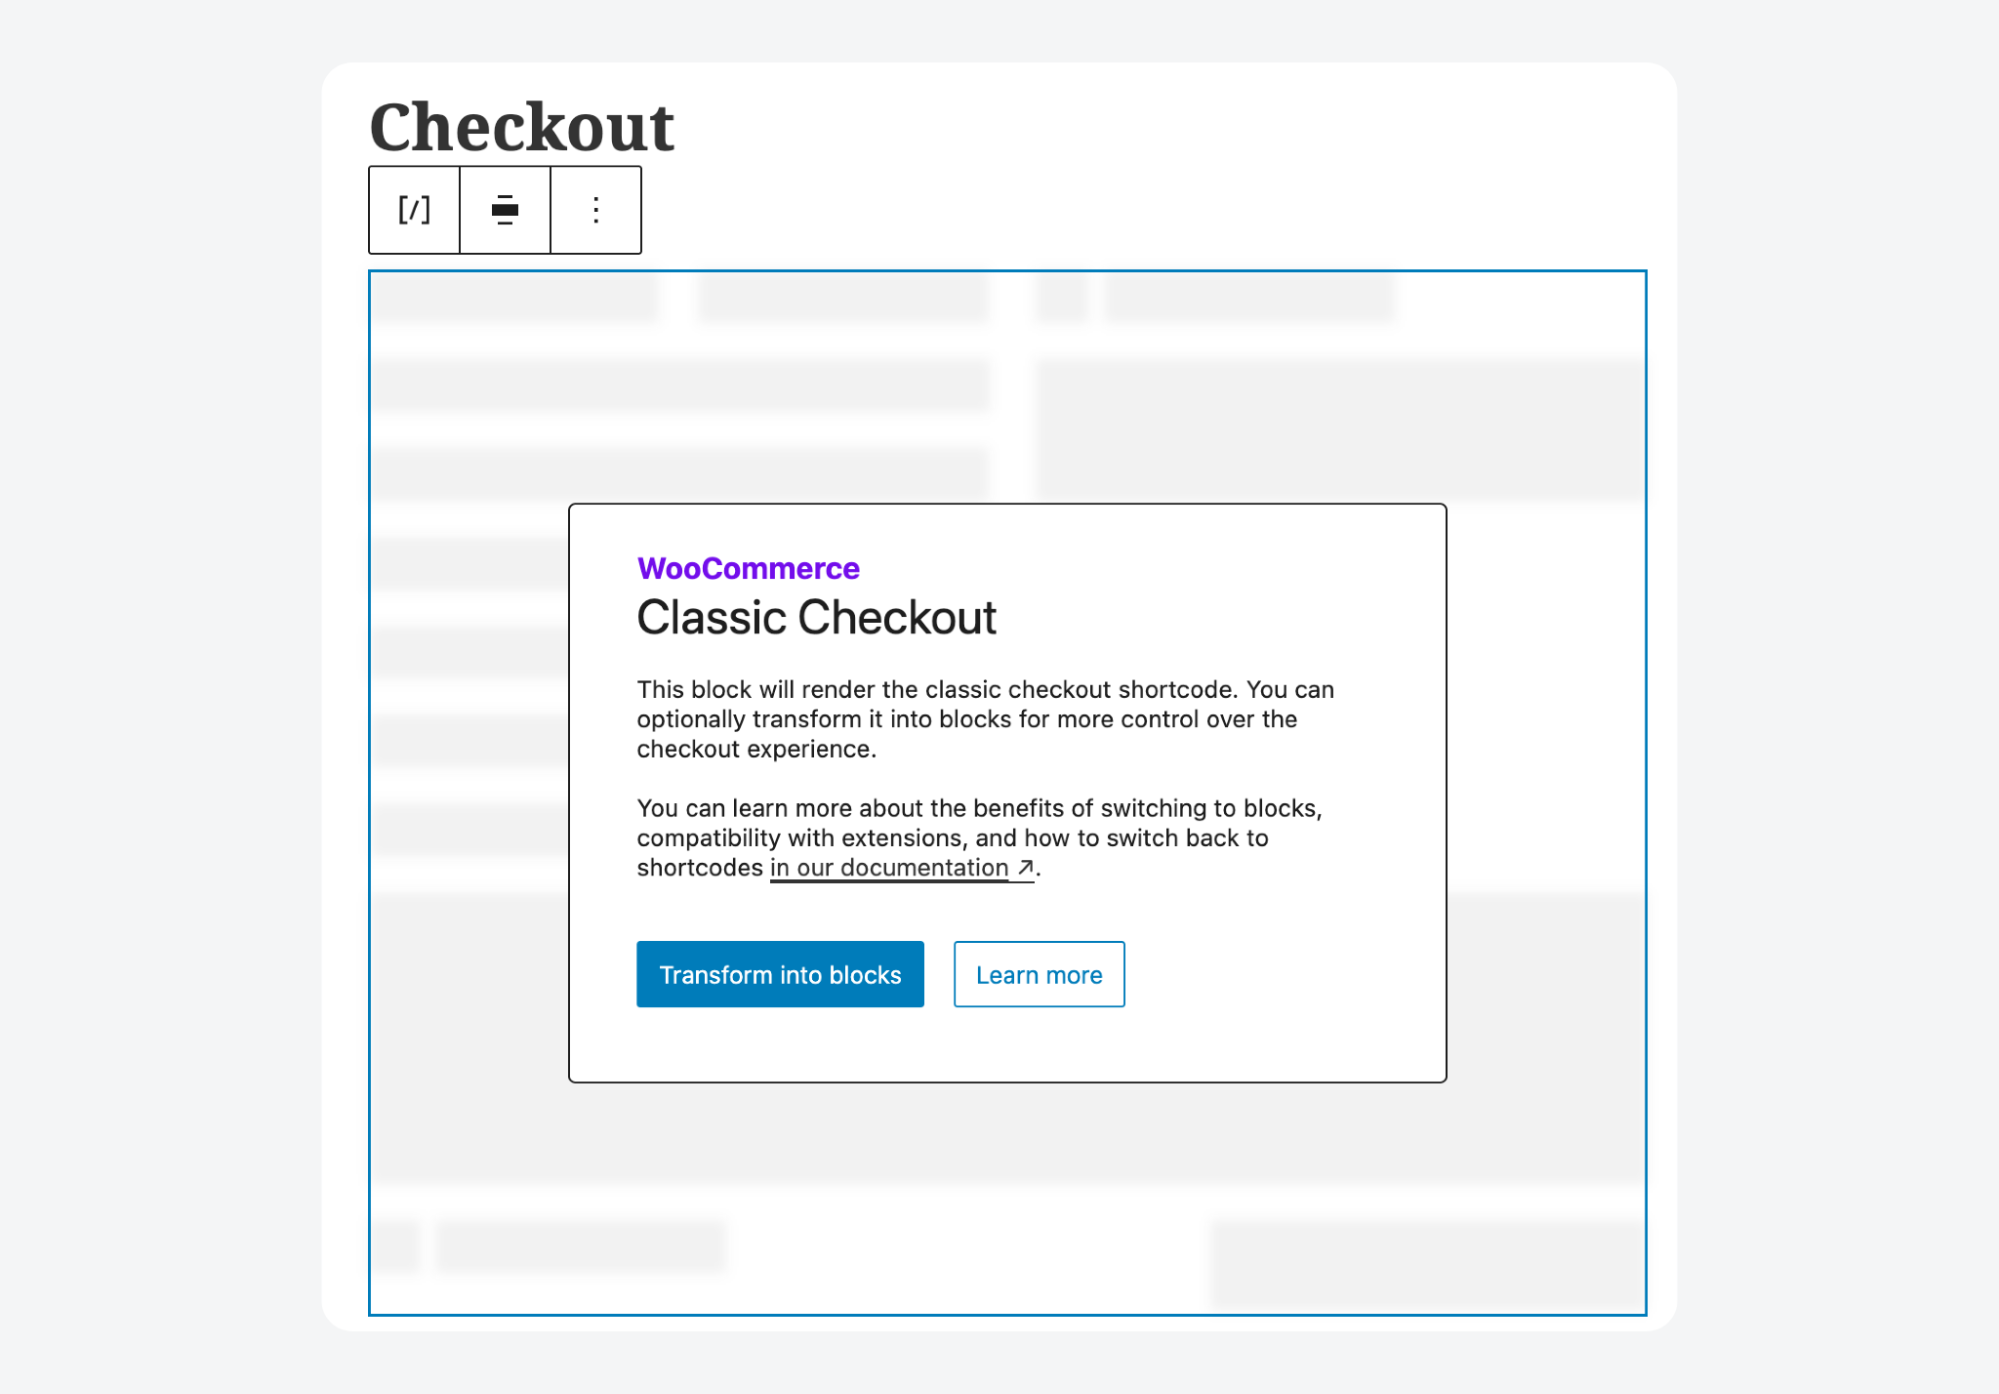
The newer system, known as the Checkout block, is built on React and appears in the editor as a block labeled Checkout.

It handles layout and interactions in the browser, which means most PHP hooks that worked in Classic simply do nothing here.
Confusing the two systems leads to issues that look like missing fields or plugins that appear installed yet never apply their changes.
A quick way to avoid that trouble is to confirm which checkout architecture is active before attempting edits or installing tools.
One interesting thing to note is that you can switch between these two options regardless of whether you’re using a block or classic theme.
What you can change in WooCommerce checkout
WooCommerce gives you a lot of control over checkout fields, though how much depends on your approach.
You can:
- Add new fields to collect information WooCommerce doesn’t ask for by default, like delivery dates, VAT numbers, gift messages, or special instructions.
- Remove fields you don’t need, such as the second address line or company name.
- Rearrange fields to match how your customers naturally fill out forms.
- Rename labels and placeholder text to be clearer or match your brand voice.
- Change validation rules to make fields required, optional, or conditional based on other inputs.
Three paths get you there:
- WooCommerce’s built-in settings – limited but don’t require much technical skill.
- Custom code using WooCommerce hooks and filters – flexible but requires PHP knowledge.
- Plugins like Advanced Custom Fields (ACF®) – the practical middle ground for most store owners.
What you can change with built-in settings
WooCommerce includes toggles that influence the checkout page, but it doesn’t let you edit the fields directly.
There’s no built-in screen where you add, remove, or rearrange inputs, so the controls you do get work indirectly:
- Store location settings decide which address fields make sense for your region. If your store only sells domestically, you might see fewer inputs than shops selling internationally. Changing selling locations or the default customer location adjusts which fields WooCommerce thinks are relevant.
- Shipping settings determine whether a shipping address section appears at all. Stores selling only downloads, or shops offering local pickup without delivery, may not show any shipping address form because WooCommerce knows it isn’t needed.
- Account settings influence whether customers create an account during checkout. Enabling guest checkout removes username and password prompts, which shortens the form.
These toggles help simplify checkout, but they don’t let you customize individual fields. To remove something, add new inputs, or control which fields are optional, you’ll need either a plugin or custom development.
Main approaches to customizing your WooCommerce checkout
There are several paths you can take to change how WooCommerce checkout works, and each one fits a different level of complexity:
- Stores running the newer Checkout block rely on a React-based system that offers a neat mobile layout, though bigger changes often require development knowledge.
- Plugins offer a no-code route with a visual editor, so you can add or adjust inputs without touching templates.
- Code gives the greatest control, but only applies to Classic checkout, because most PHP hooks do nothing in the Block system. If you tried PHP snippets on a Block-based store, nothing would appear.
Match your needs with the right approach:
| Scenario (What to do) | What to use | Why it works |
| Toggle optional address fields | WooCommerce settings | Built in and does not require tools |
| Add a few simple fields | Free checkout field editor plugin | Visual editor without development work |
| Add fields that change based on cart or products | Conditional plugin or ACF with code | Flexible enough to adapt to data |
| Configure different checkout layouts for varying needs | ACF plus custom code | ACF stores settings and code handles display |
| Add inputs that need custom validation or processing | Code in Classic or JS APIs in Blocks | Full control over logic and saving |
| Deliver a streamlined mobile checkout | Checkout block with compatible plugins | Modern layout tuned for smaller screens |
How to add WooCommerce custom checkout fields
The WooCommerce checkout experiences for Block and Classic are built on different technologies, so the method for adding custom fields isn’t interchangeable. PHP hooks won’t work on Block checkout, and JavaScript-based solutions won’t work on Classic.
One thing does apply to both, though: if your store uses High-Performance Order Storage (HPOS), you’ll need to save custom field values with $order->update_meta_data() instead of the older post meta functions.
If you’re using classic checkout
Classic checkout runs on PHP, which means you can customize it using WooCommerce’s built-in hooks like woocommerce_checkout_fields or by overriding template files directly.
Most checkout field tutorials and plugins you’ll find online were written for Classic checkout, so compatibility is rarely an issue. If you need deep customization flexibility – conditional fields, complex validation, tight control over markup – Classic checkout with PHP is still the most capable option.
Method 1: Add custom checkout fields using code
Writing your own code gives you full control over checkout fields, but it requires PHP knowledge and careful attention to WooCommerce’s data handling conventions.
The core hook for field customization is woocommerce_checkout_fields, which passes you an array of all checkout fields organized by section: billing, shipping, account, and order. You can modify this array to add new fields, remove existing ones, or change their properties:
- Add a custom field by appending a new array to the appropriate section. Each field needs a type, label, and usually a placeholder and required value. You can add fields to billing, shipping, or the order section, depending on where the data belongs.
- Remove a field using
unset()on the field key. For example, unsettingbilling_companyremoves the company name field. - Modify a field by changing its array values directly. You can update labels, placeholders, CSS classes, or toggle the required property.
- Validate input by hooking into
woocommerce_checkout_processand checking submitted values. Usewc_add_notice()to display errors. - Save the data using
$order->update_meta_data()inside thewoocommerce_checkout_create_orderhook. This approach is required for HPOS compatibility.
You can also make fields conditional based on cart contents and style them using CSS classes passed in the field array.
Method 2: Add custom checkout fields using plugins
If PHP isn’t your thing, a checkout field plugin handles the technical work and gives you a visual interface for managing fields.
Two popular options are Checkout Field Editor for WooCommerce and Flexible Checkout Fields. Both let you add, edit, reorder, and remove fields using a drag-and-drop UI. They support a wide range of field types, including:
- Text
- Textarea
- Select dropdowns
- Radio buttons
- Checkboxes
- Date pickers
- Color pickers
Most field editor plugins also include conditional logic. You can show or hide fields based on products in the cart, product categories, cart total, shipping method, or user role. This streamlines checkout by only asking relevant questions.
Custom field data typically flows through to order confirmation emails, the admin order screen, and CSV exports, though you’ll want to verify this works as expected for your setup.
- With the plugin installed and activated, go to WooCommerce > Checkout Form.
- In the Checkout Fields tab, switch to the Classic Checkout option.
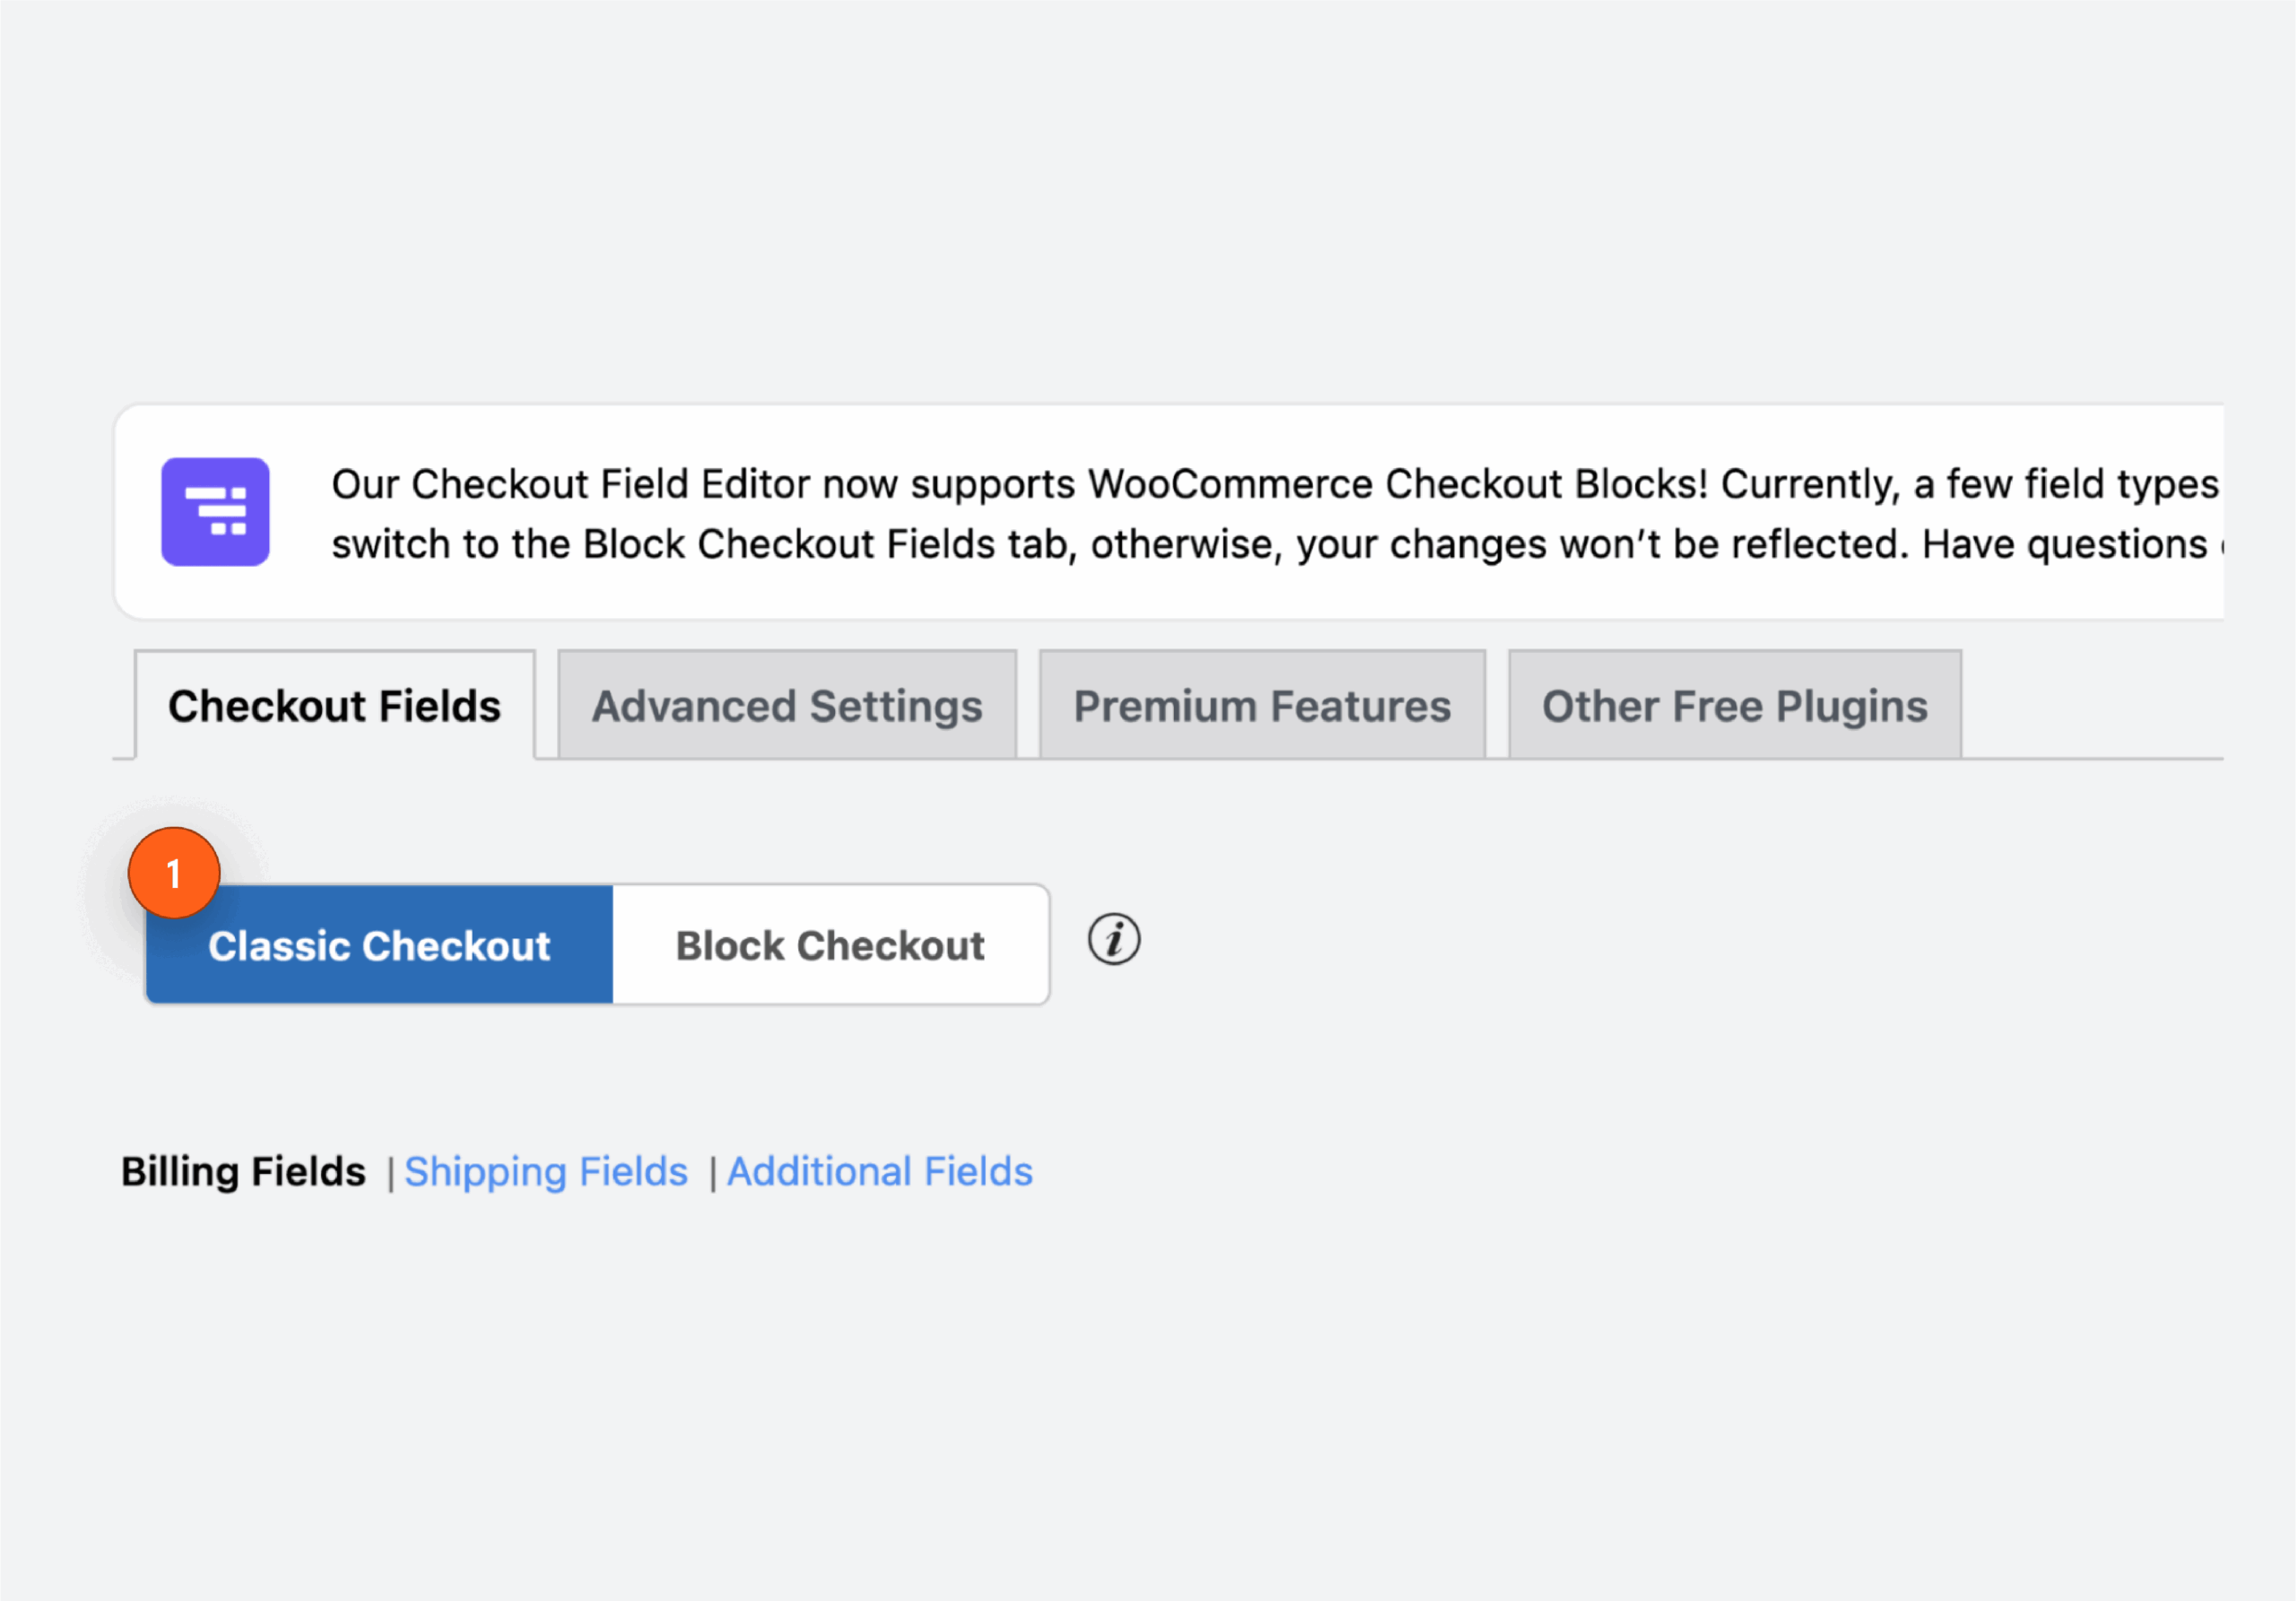
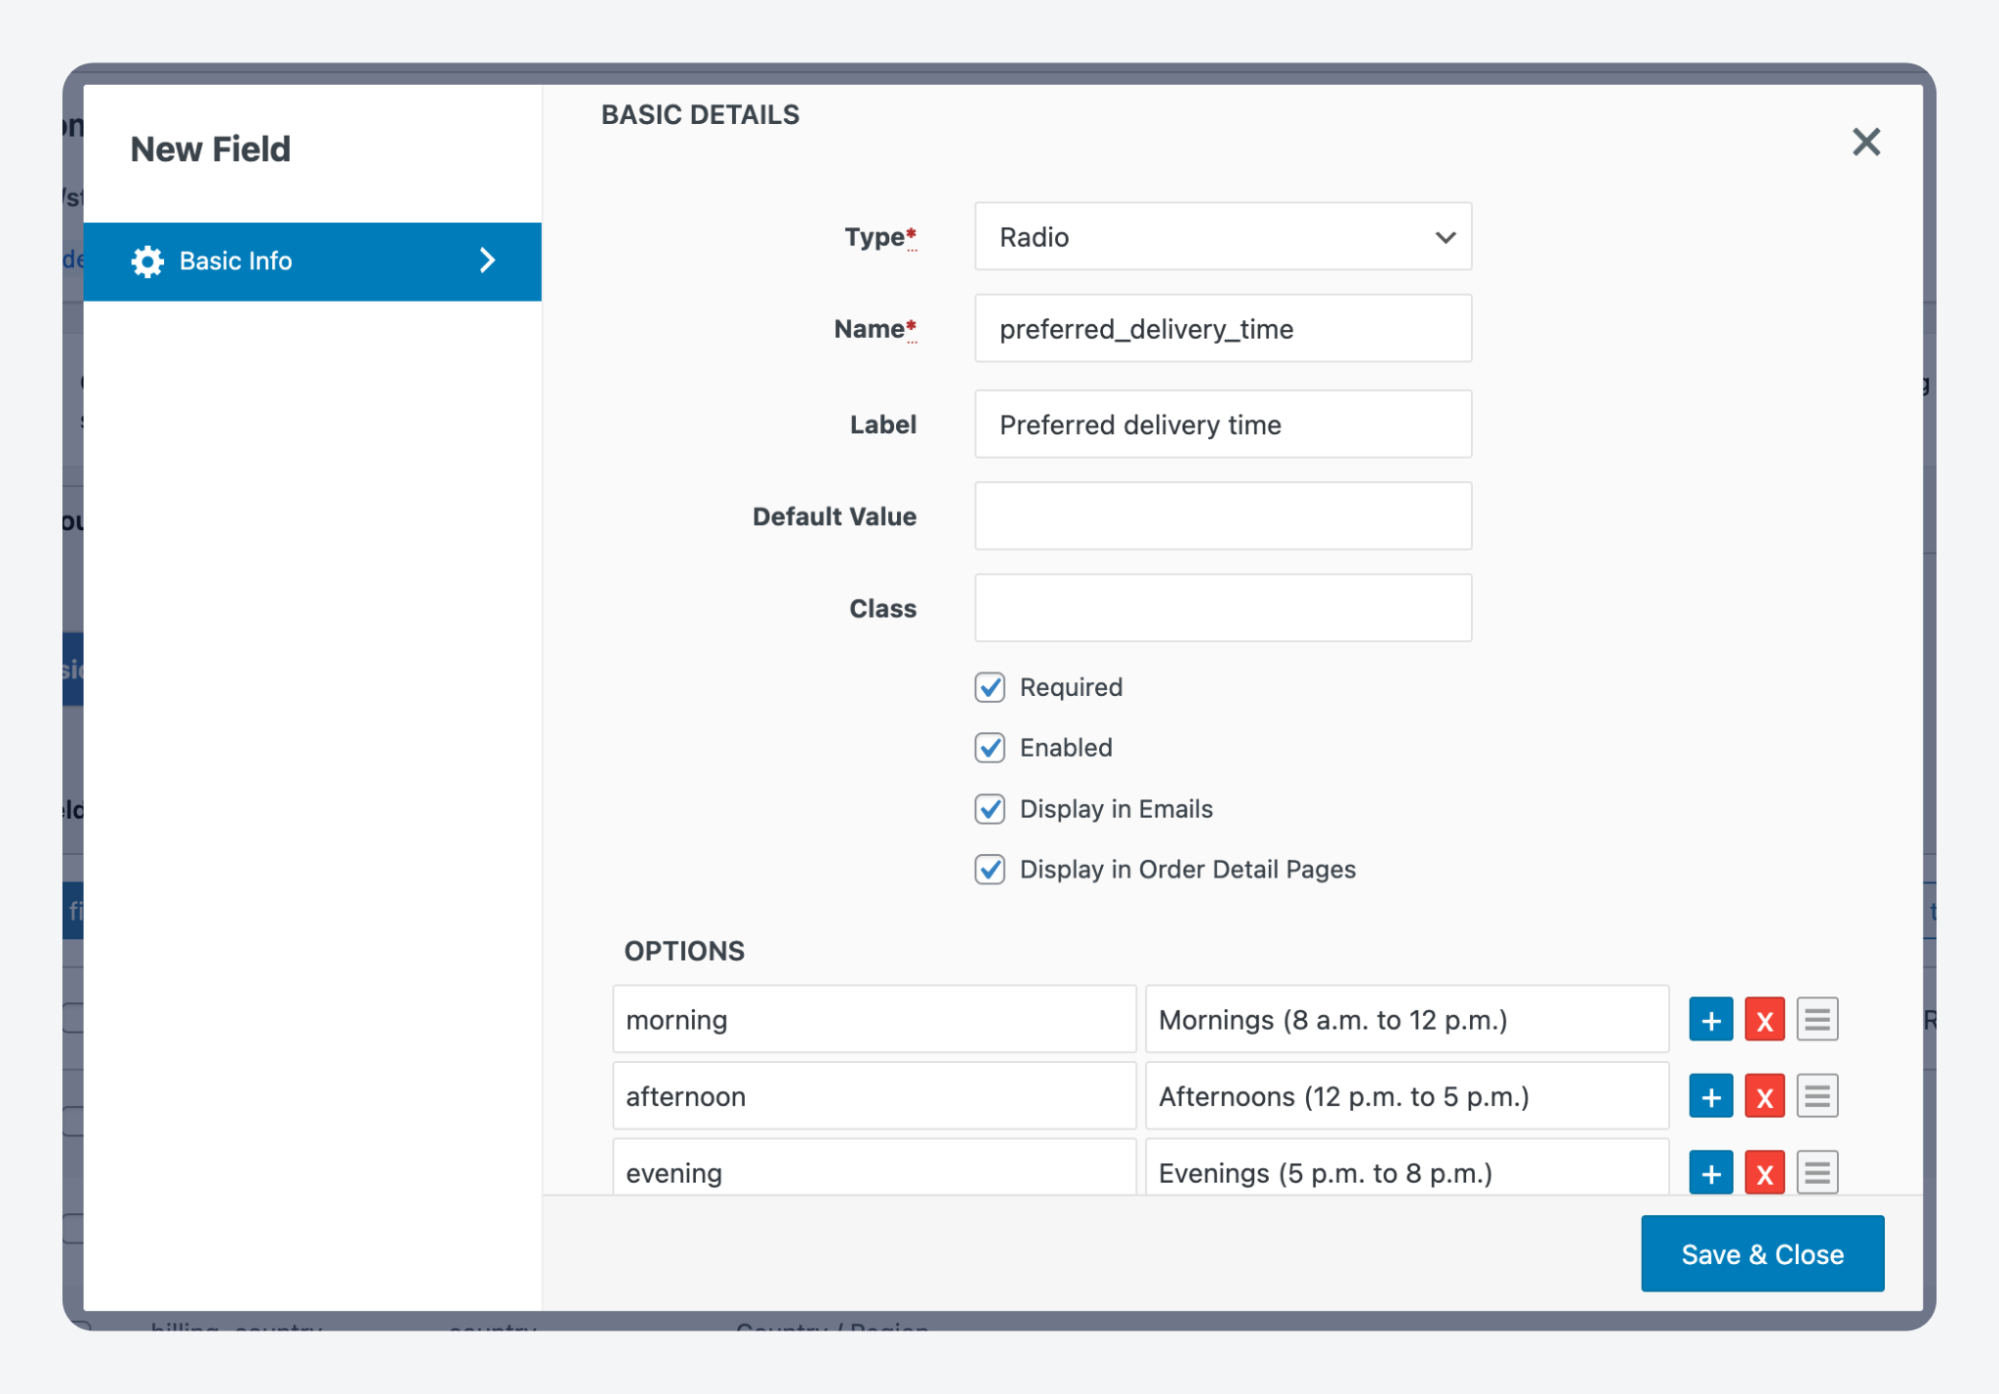
- Click Add Field and add your custom field’s details, with unique names and useful labels, then click Save & Close.
- Drag the field where you want it to appear, then save your changes.
- Load up the checkout page and confirm it works.
If the field doesn’t show, your site is probably using the Checkout block. To switch to classic:
- Go to Pages > All Pages and find the checkout page.
- Open it, delete the Checkout block, search for and add the Classic Checkout block.
- If this isn’t available, add a shortcode block with
\[woocommerce_checkout]. - Save.
⚠️A few things can go wrong when using this method.
Theme conflicts sometimes break field display, especially with heavily styled themes. Plugin conflicts can occur if you’re running multiple checkout customization tools. And not all plugins support HPOS yet, so check compatibility before installing. When troubleshooting, disable other plugins temporarily to isolate the issue.
Method 3: Add advanced checkout fields using ACF
ACF sits between hand-coded PHP and scope-limited checkout plugins.
You get a proper UI for defining fields, but with enough flexibility to handle complex requirements, and you won’t outgrow it as your needs evolve.
Say you sell custom engraved products and need to collect engraving text, font choice, and a preview approval checkbox, but only for products in a specific category. ACF lets you define this field group once in the admin, then display it conditionally at checkout with a small snippet of code.
ACF isn’t checkout-specific, which makes it more versatile than single-purpose plugins.
The same field management interface works for product pages, user profiles, settings screens, and more. If you’re already using ACF elsewhere in your store (like for adding custom fields to WooCommerce products), extending it to checkout keeps your workflow consistent.
The setup has two parts: defining the field in ACF’s visual interface, then adding a small code snippet to display and save it.
To create a radio where the customer can choose when they want the order delivered to them from three options.
First, create the field group:
- Go to ACF > Field Groups and click Add New. Name it something descriptive like “Delivery window.”
- Click Add Field. For this example, set the field type to Radio Button, the label to “Preferred delivery time,” to get a matching field name, then add the options.
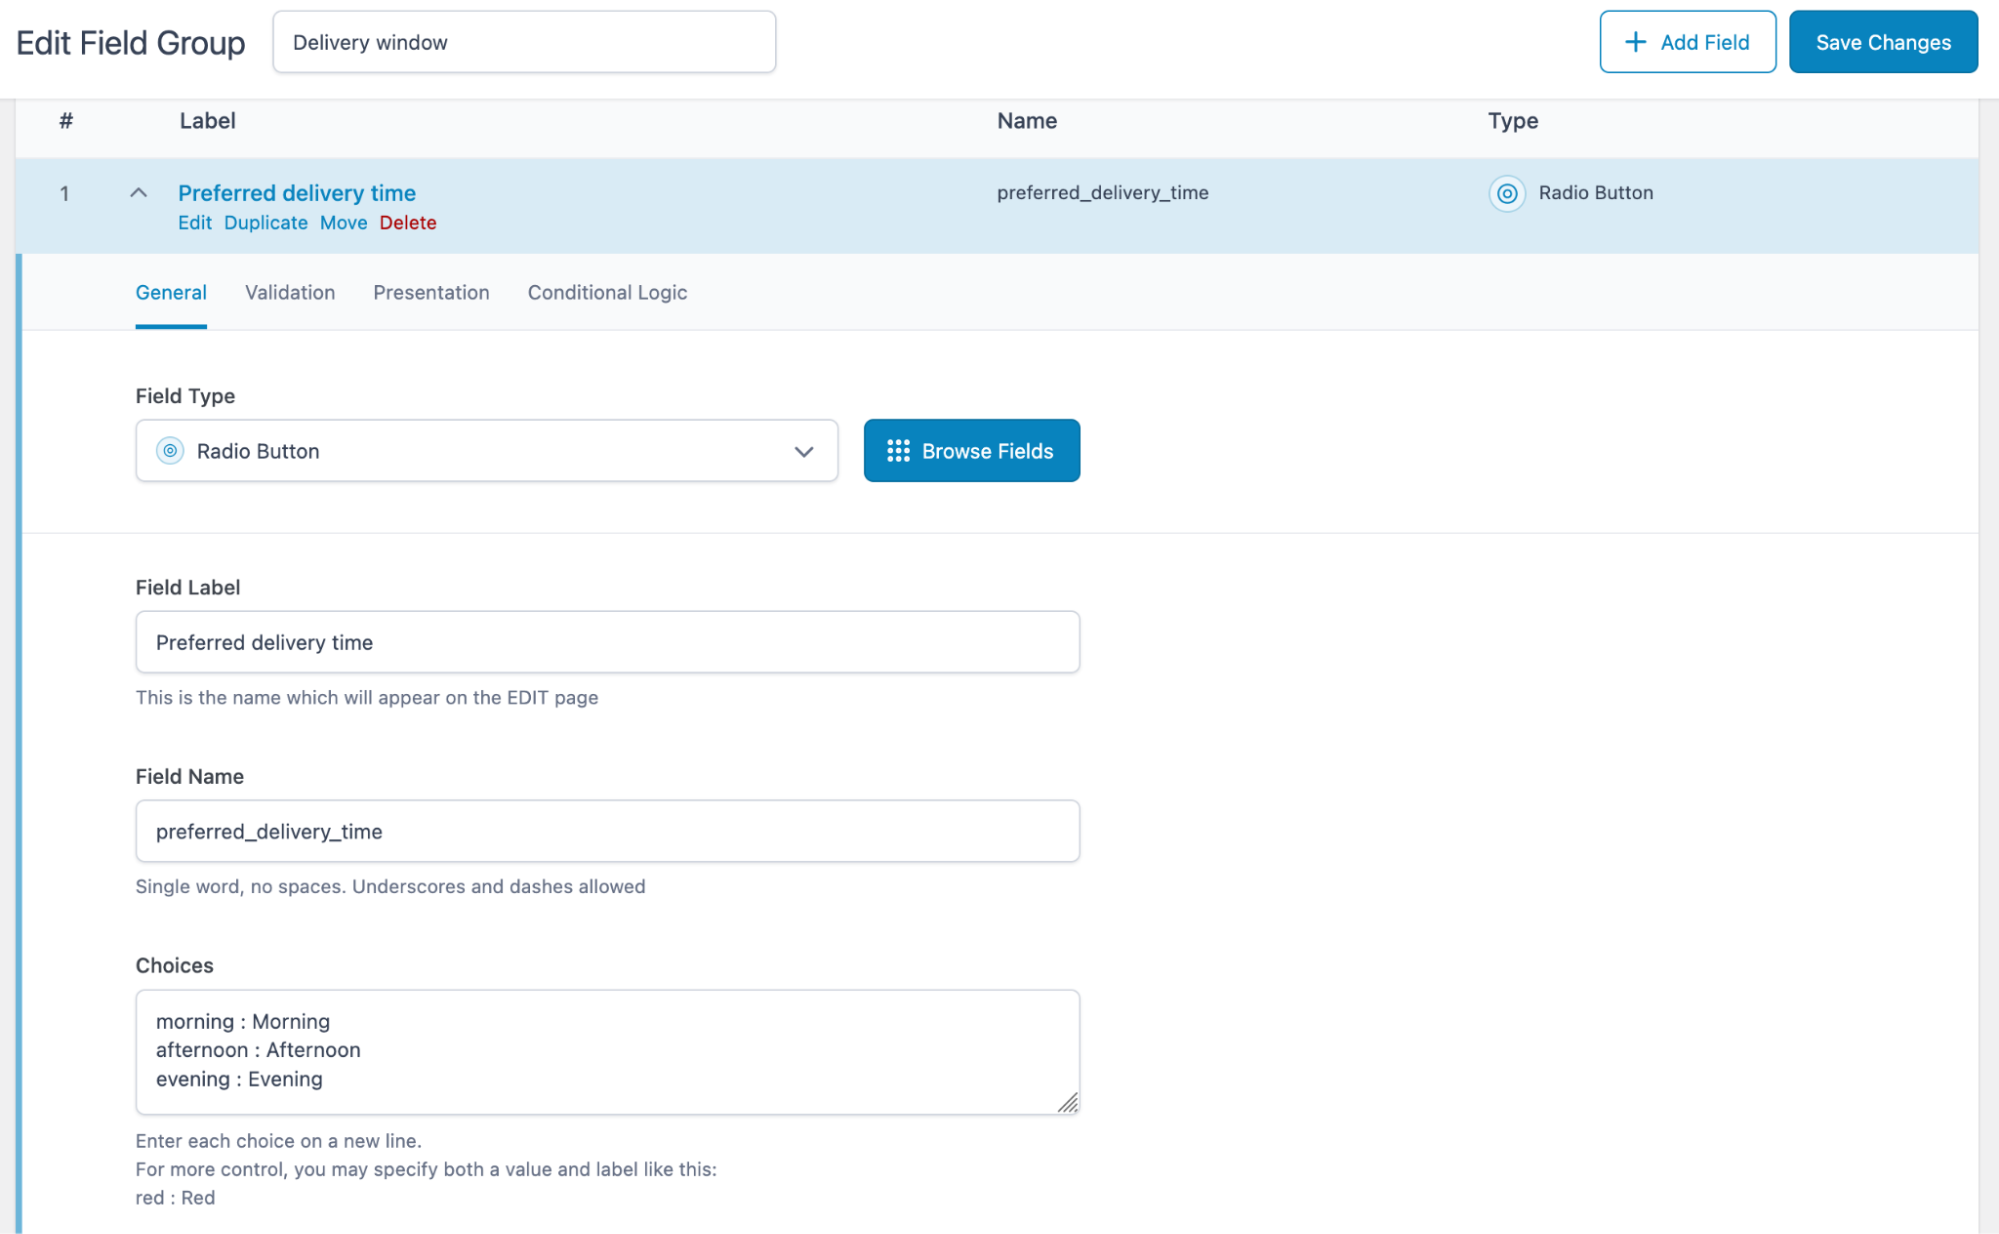
- Add any other fields you need to this group. ACF’s interface lets you set field widths, instructions, and default values, all without code.
- To ensure the field doesn’t show up all over your backend, set the location rules to Page is equal to Checkout.

- Publish the field group.
Next, add the code to display and save the field. This goes in your theme’s functions.php file, code snippet, or a custom plugin. If you’re not comfortable with any of these options, ask your developer to handle this step.
It’s a quick enough job and you’ll usually only need to do it once.
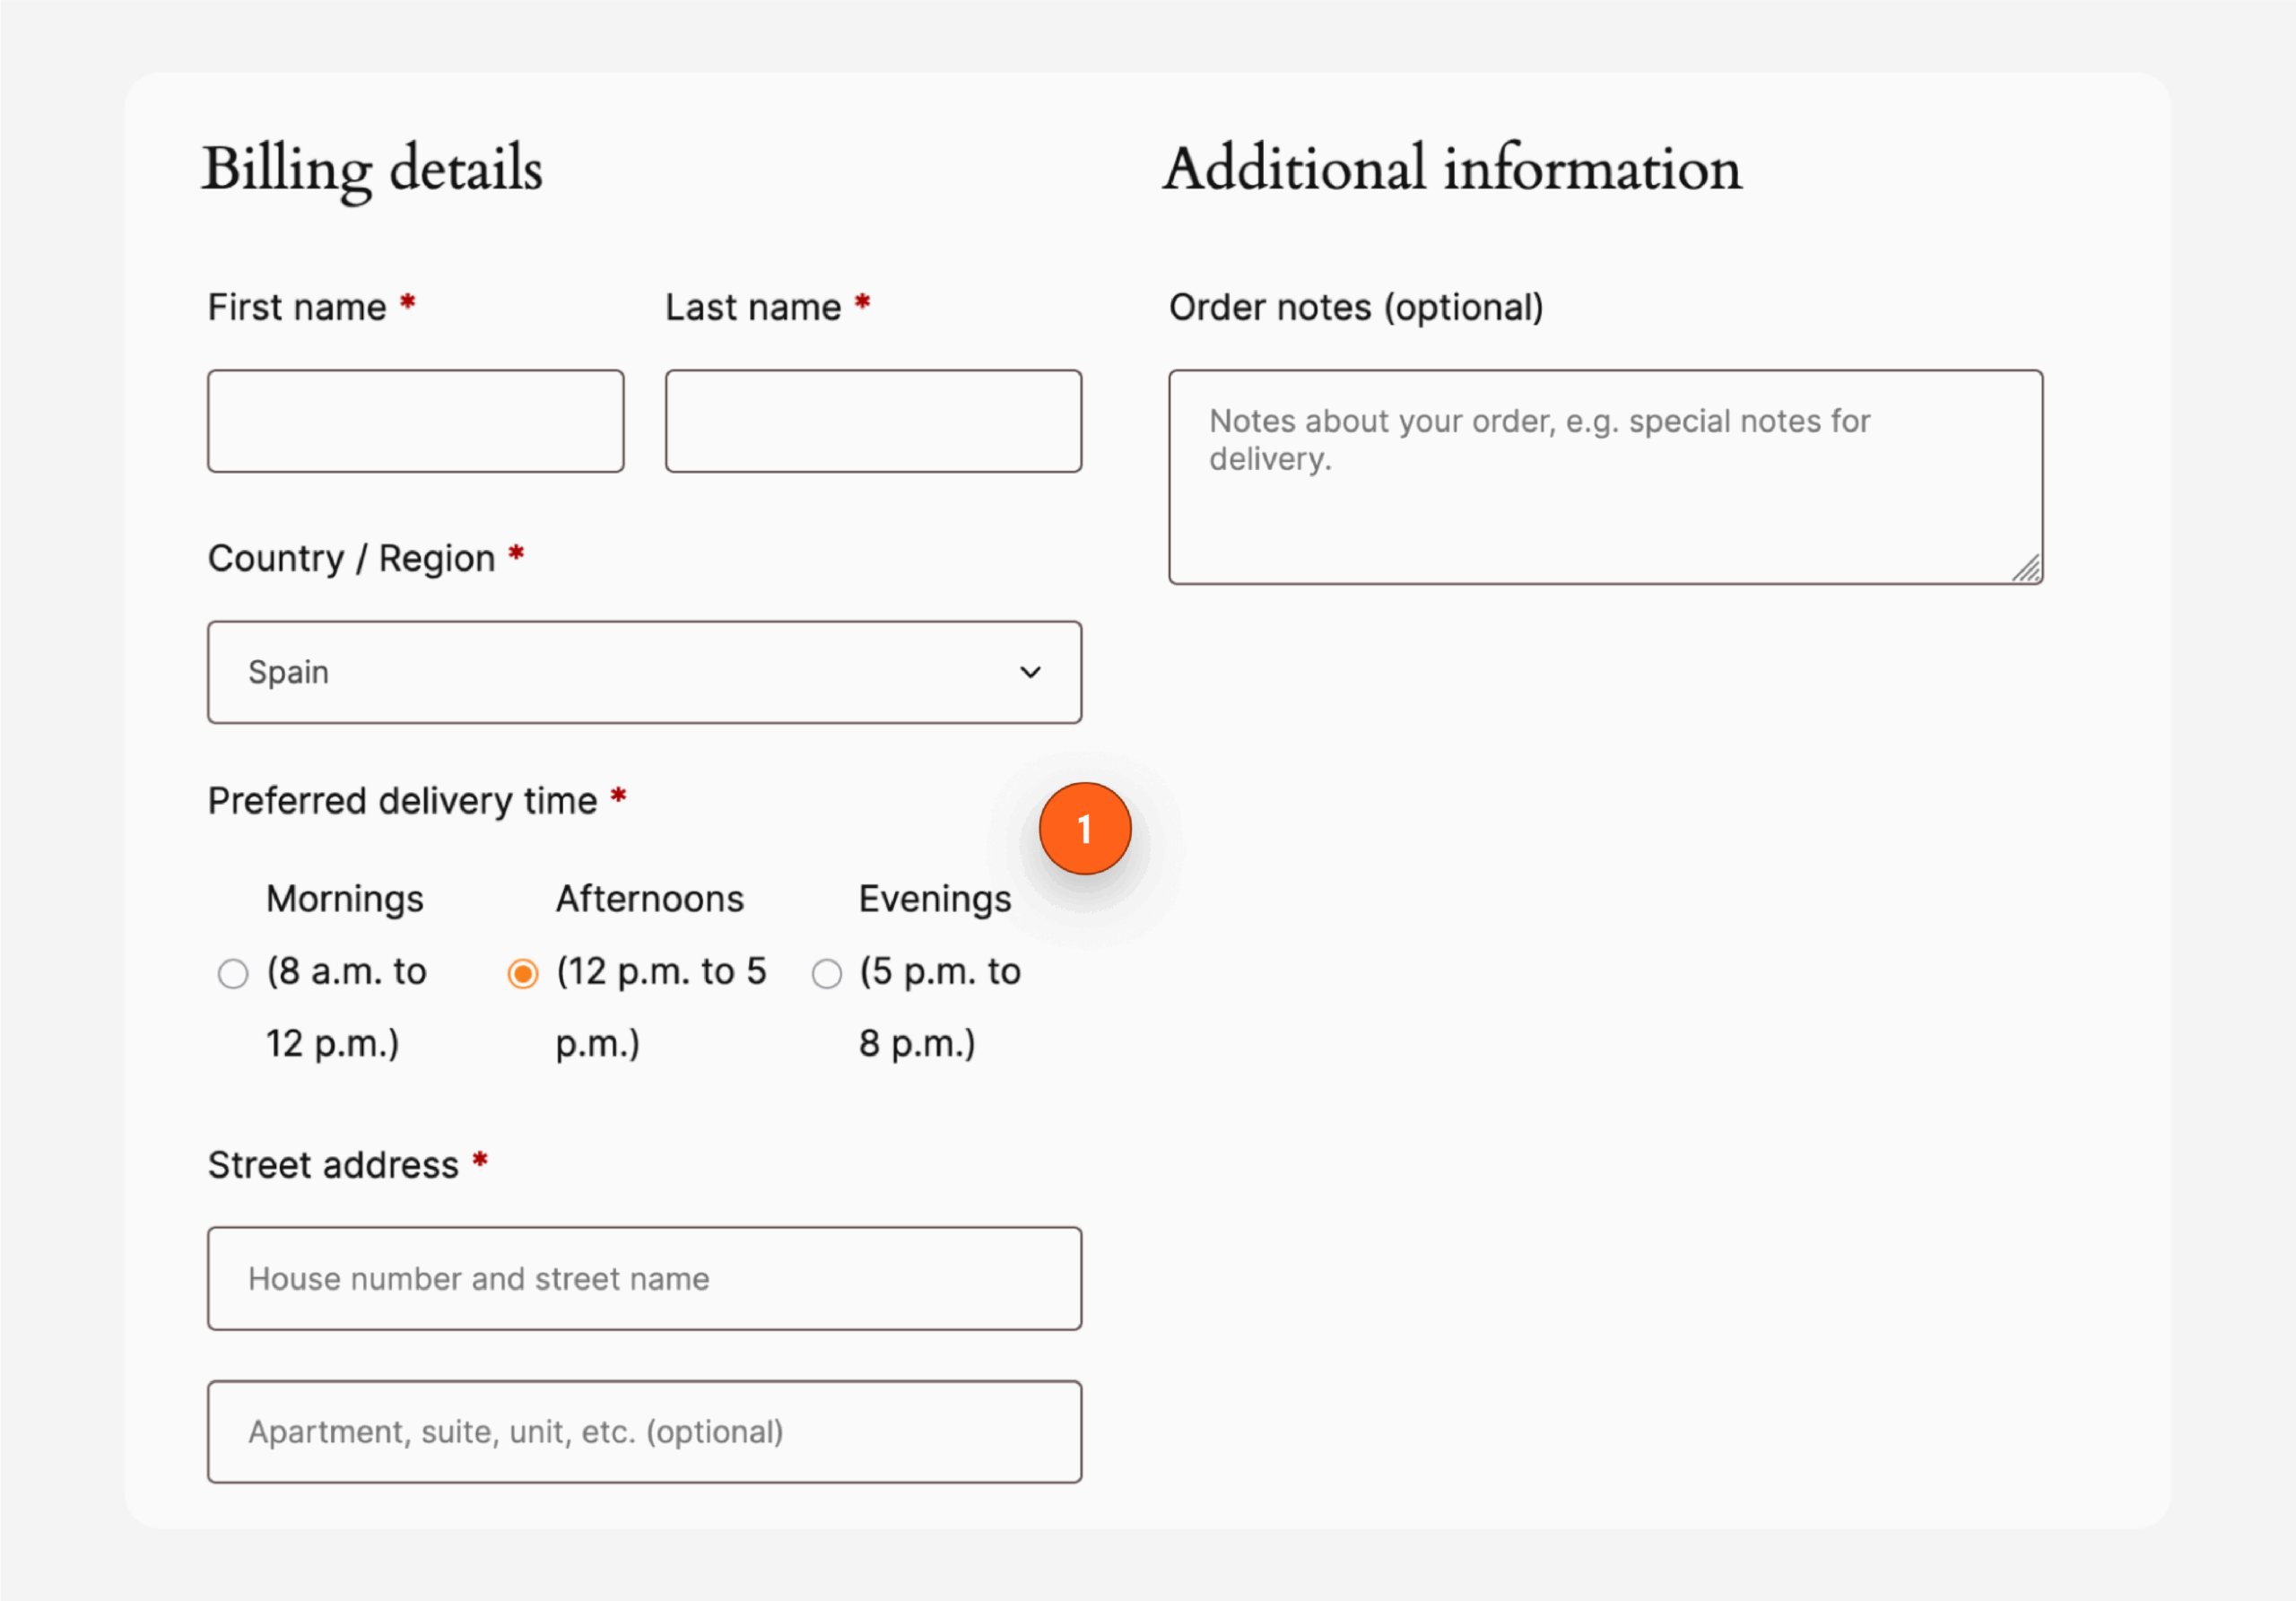
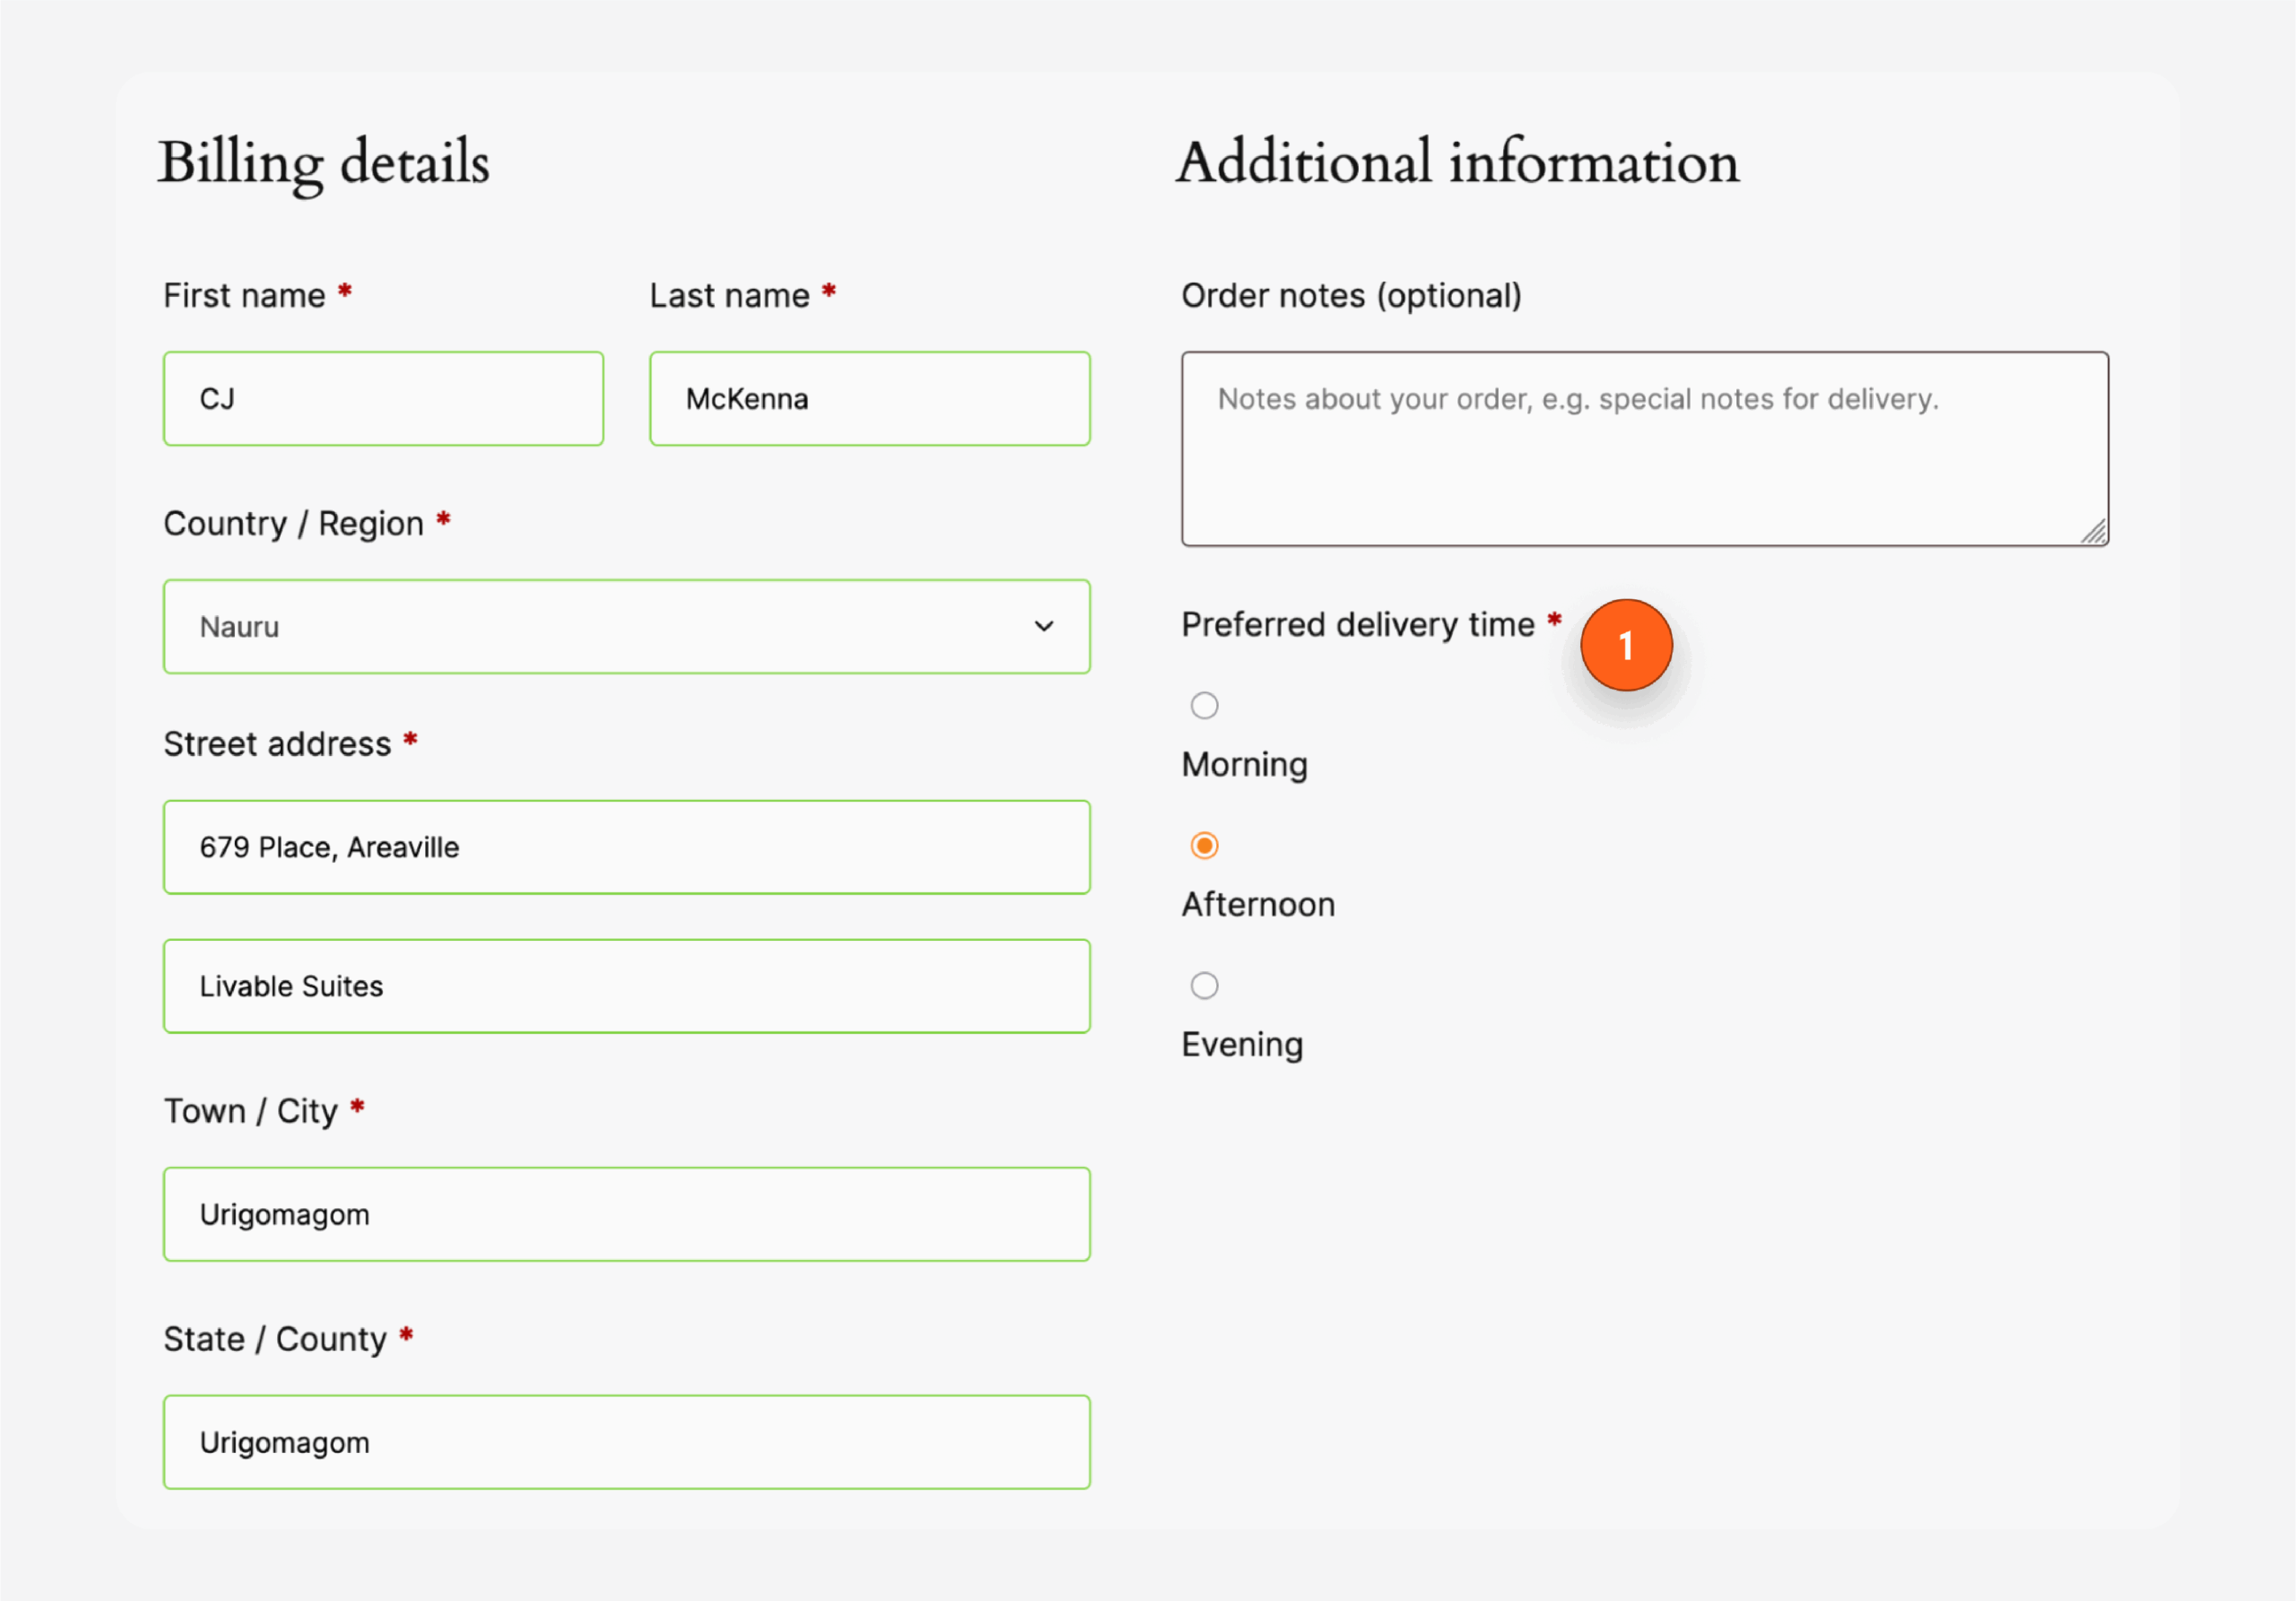
The first part involves adding a radio field to the classic WooCommerce checkout form, under the order notes. Customers see a group labeled “Preferred delivery time” with three choices – Morning, Afternoon, and Evening:
add_action( 'woocommerce_after_order_notes', 'my_delivery_time_field' );
function my_delivery_time_field( $checkout ) {

    woocommerce_form_field( 'preferred_delivery_time', array(
        'type'     => 'radio',
        'label'    => __( 'Preferred delivery time', 'textdomain' ),
        'required' => true,
        'options'  => array(
            'morning'   => __( 'Morning', 'textdomain' ),
            'afternoon' => __( 'Afternoon', 'textdomain' ),
            'evening'   => __( 'Evening', 'textdomain' ),
        ),
        'class' => array( 'form-row-wide' ),
    ), $checkout->get_value( 'preferred_delivery_time' ) );
}
Then, take the customer’s selection from the checkout form and store it as order meta, using the key _preferred_delivery_time. That way, the information is permanently attached to the order in the database:
add_action( 'woocommerce_checkout_create_order', 'my_save_delivery_time_field', 10, 2 );
function my_save_delivery_time_field( $order, $data ) {
if ( ! empty( $_POST['preferred_delivery_time'] ) ) {
$order->update_meta_data(
'_preferred_delivery_time',
sanitize_text_field( $_POST['preferred_delivery_time'] )
);
}
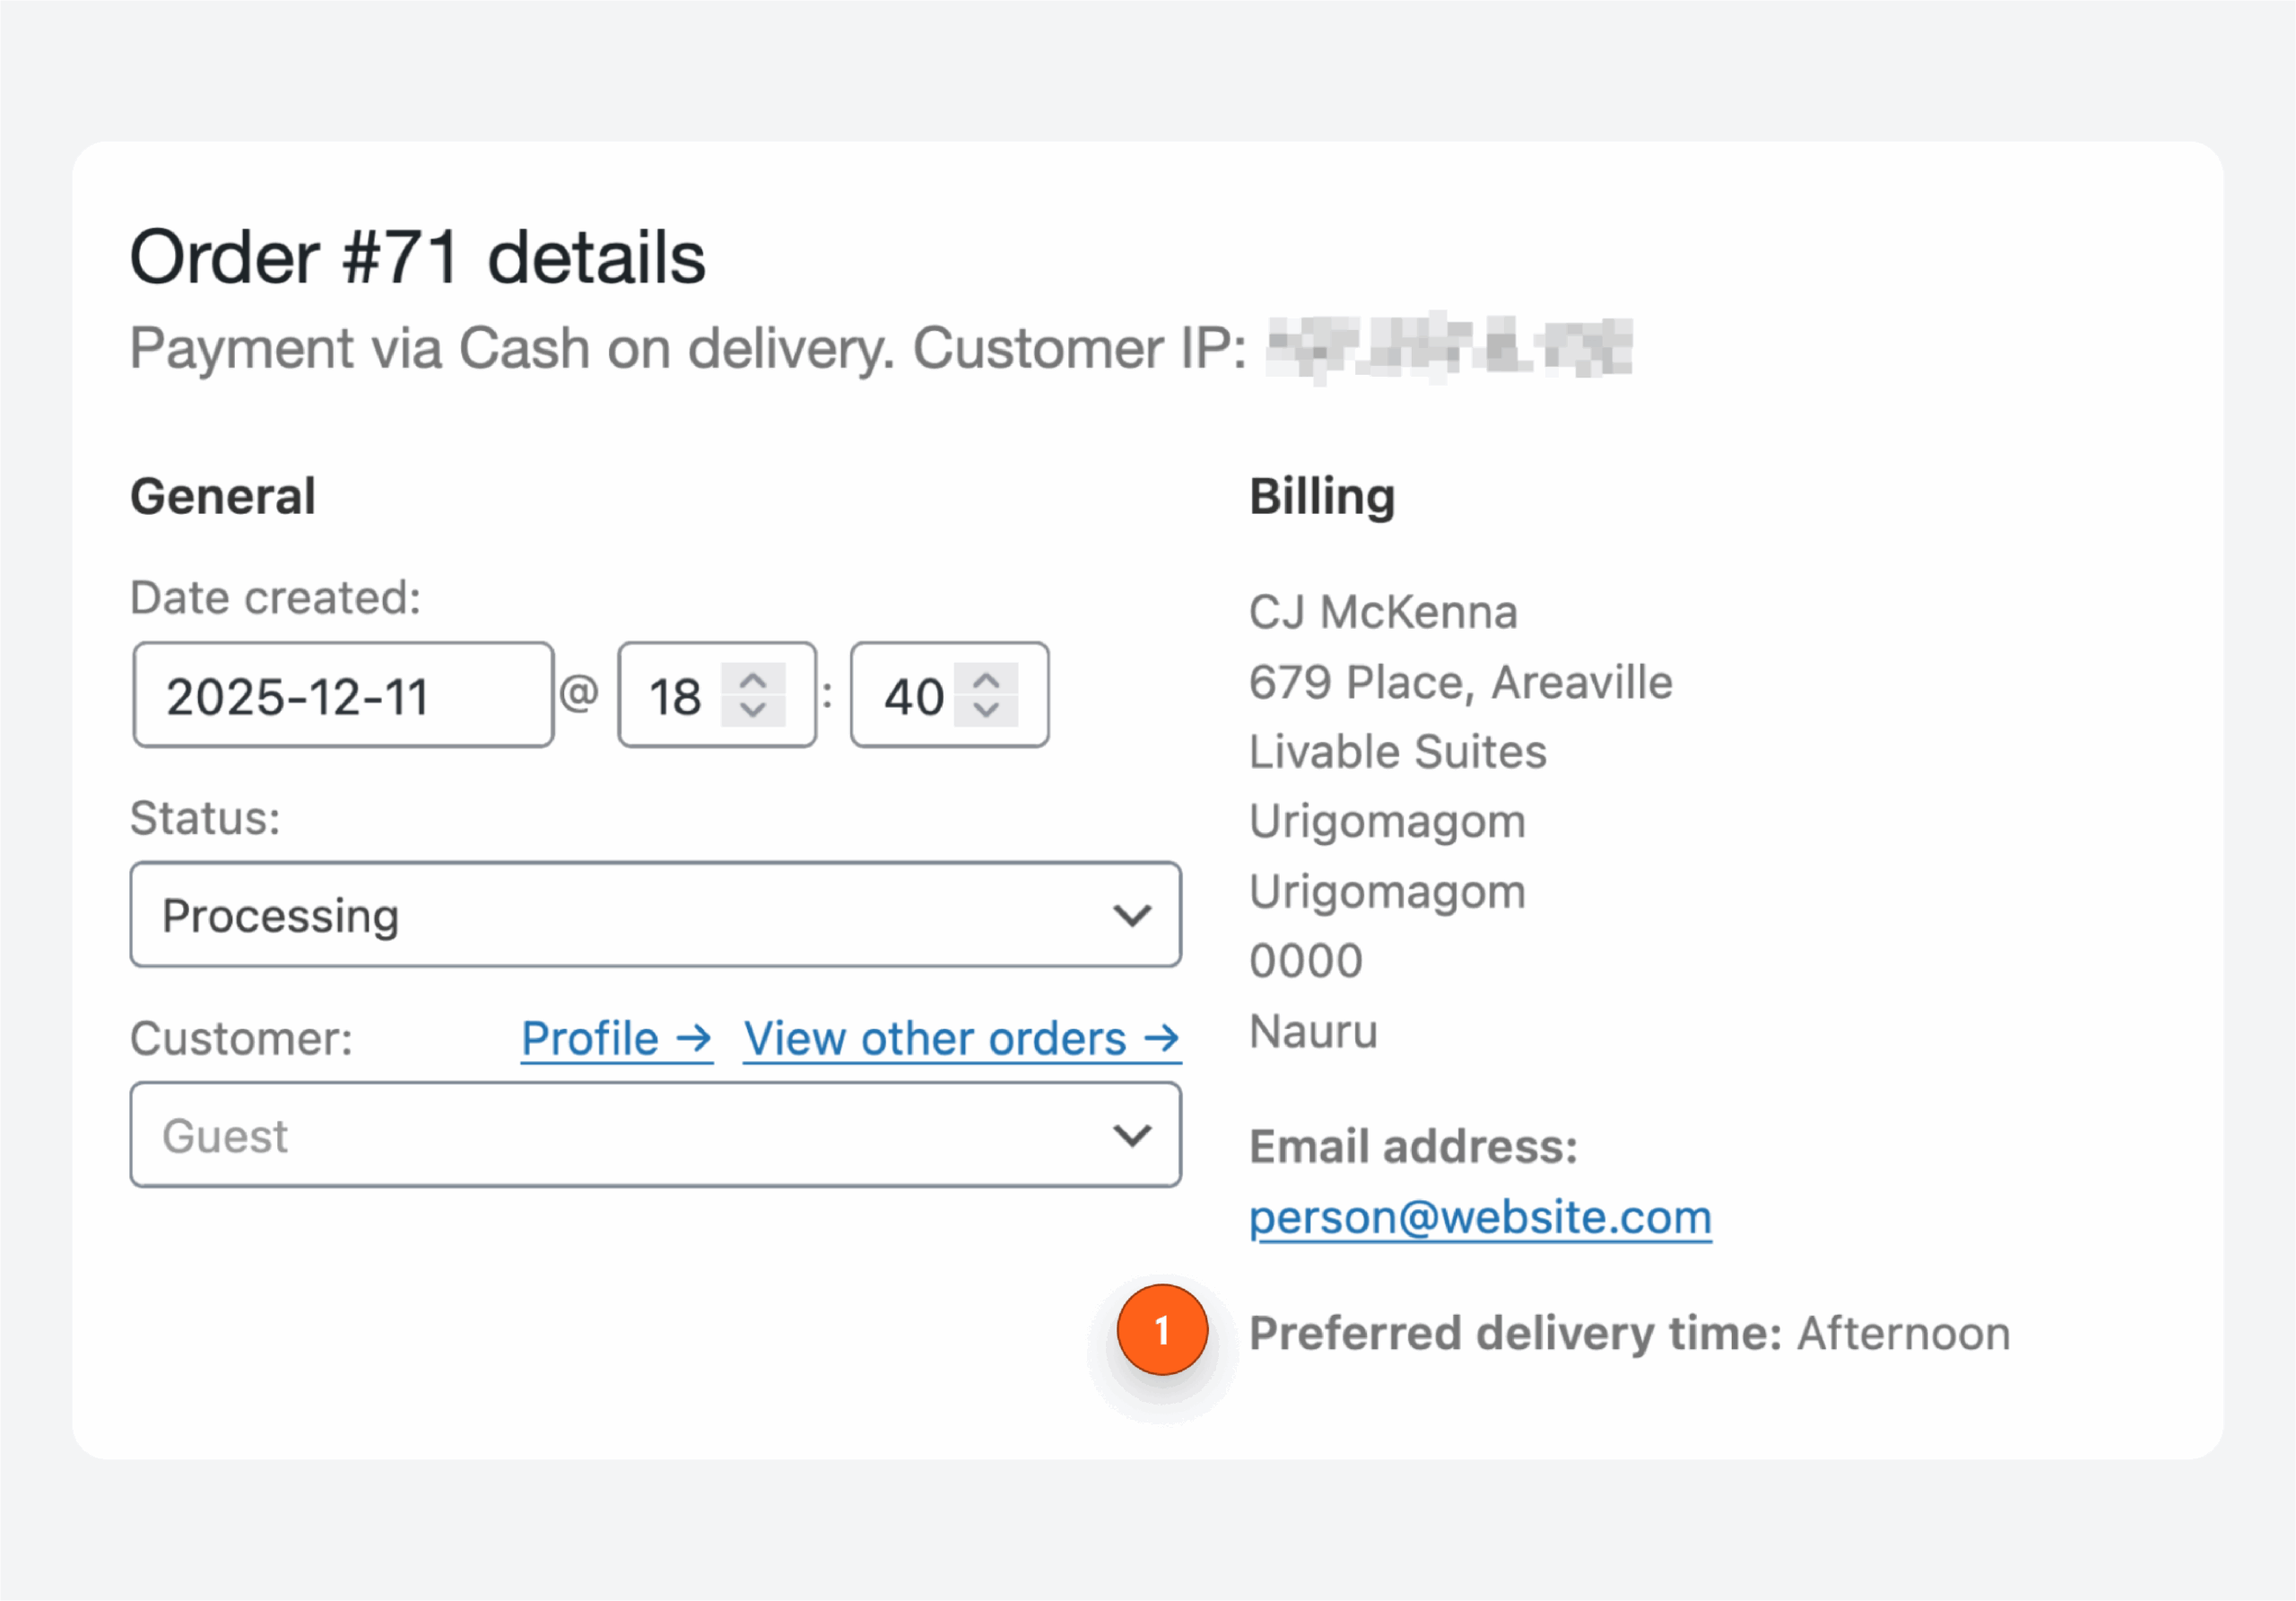
}Finally, display the saved preferred delivery time in the WooCommerce order edit screen, underneath the billing address. Converts the stored value (morning, afternoon, evening) into a human-friendly label before outputting it:
add_action( 'woocommerce_admin_order_data_after_billing_address', 'my_show_delivery_time_admin' );
function my_show_delivery_time_admin( $order ) {

    $time = $order->get_meta( '_preferred_delivery_time' );

    if ( $time ) {
        $labels = array(
            'morning'   => __( 'Morning', 'textdomain' ),
            'afternoon' => __( 'Afternoon', 'textdomain' ),
            'evening'   => __( 'Evening', 'textdomain' ),
        );

        echo '<p><strong>' . __( 'Preferred delivery time', 'textdomain' ) . ':</strong> '
            . esc_html( $labels[ $time ] ?? $time ) . '</p>';
    }
}
Once that’s in place, test the full flow: add a product to cart, go through checkout, choose your preferred delivery time, and confirm it appears in the order details.
The real value of ACF shows up when you need to change things later.
Adding a new field or adjusting options happens in the ACF interface, with no code changes required. You only touch PHP when you need to display the field somewhere new or change where it appears on the page.
Supercharge Your Website With Premium Features Using ACF PRO
Speed up your workflow and unlock features to better develop websites using ACF Blocks and Options Pages, with the Flexible Content, Repeater, Clone, Gallery Fields & More.
If you’re using the Checkout block
As we’ve established, the Checkout block is WooCommerce’s newer checkout experience, built on React and the WordPress block editor. You can customize it visually – toggling fields on or off, reordering sections, adding Express Checkout options – without touching code.
That visual simplicity comes with a tradeoff.
Because the Checkout block runs on JavaScript rather than PHP, the classic customization methods don’t work here. You can’t use woocommerce_checkout_fields or template overrides. Advanced customization means working with WooCommerce’s Block extensibility APIs, which require JavaScript and React knowledge.
For developers, those APIs are capable. You get Slots and Fills for inserting custom components, built-in validation hooks, and conditional visibility rules. But the ecosystem is still maturing. Not all checkout plugins and extensions support the Block checkout yet, so check compatibility before committing to this path.
The upside is that the Checkout block delivers better mobile UX out of the box, modern styling that matches the block editor aesthetic, and improved performance. If your store prioritizes an organized, fast checkout and you don’t need heavy customization, it’s a better foundation going forward.
Method 1: Use Block-compatible checkout field plugins
The easiest way to add custom fields to Block checkout is with a plugin built specifically for it. These plugins give you a no-code interface for creating fields that work within the Block architecture.
When evaluating plugins, check for two things:
- explicit Checkout block support
- and HPOS compatibility.
Many older checkout field plugins were built for Classic checkout only and won’t function correctly – or at all – with the block version. Plugin listings and documentation usually state block compatibility clearly; if they don’t mention it, assume it’s not supported.
As you might have guessed, Checkout Field Editor for WooCommerce also works here. The process is the same as before, except now you’re working within the Block Checkout section.
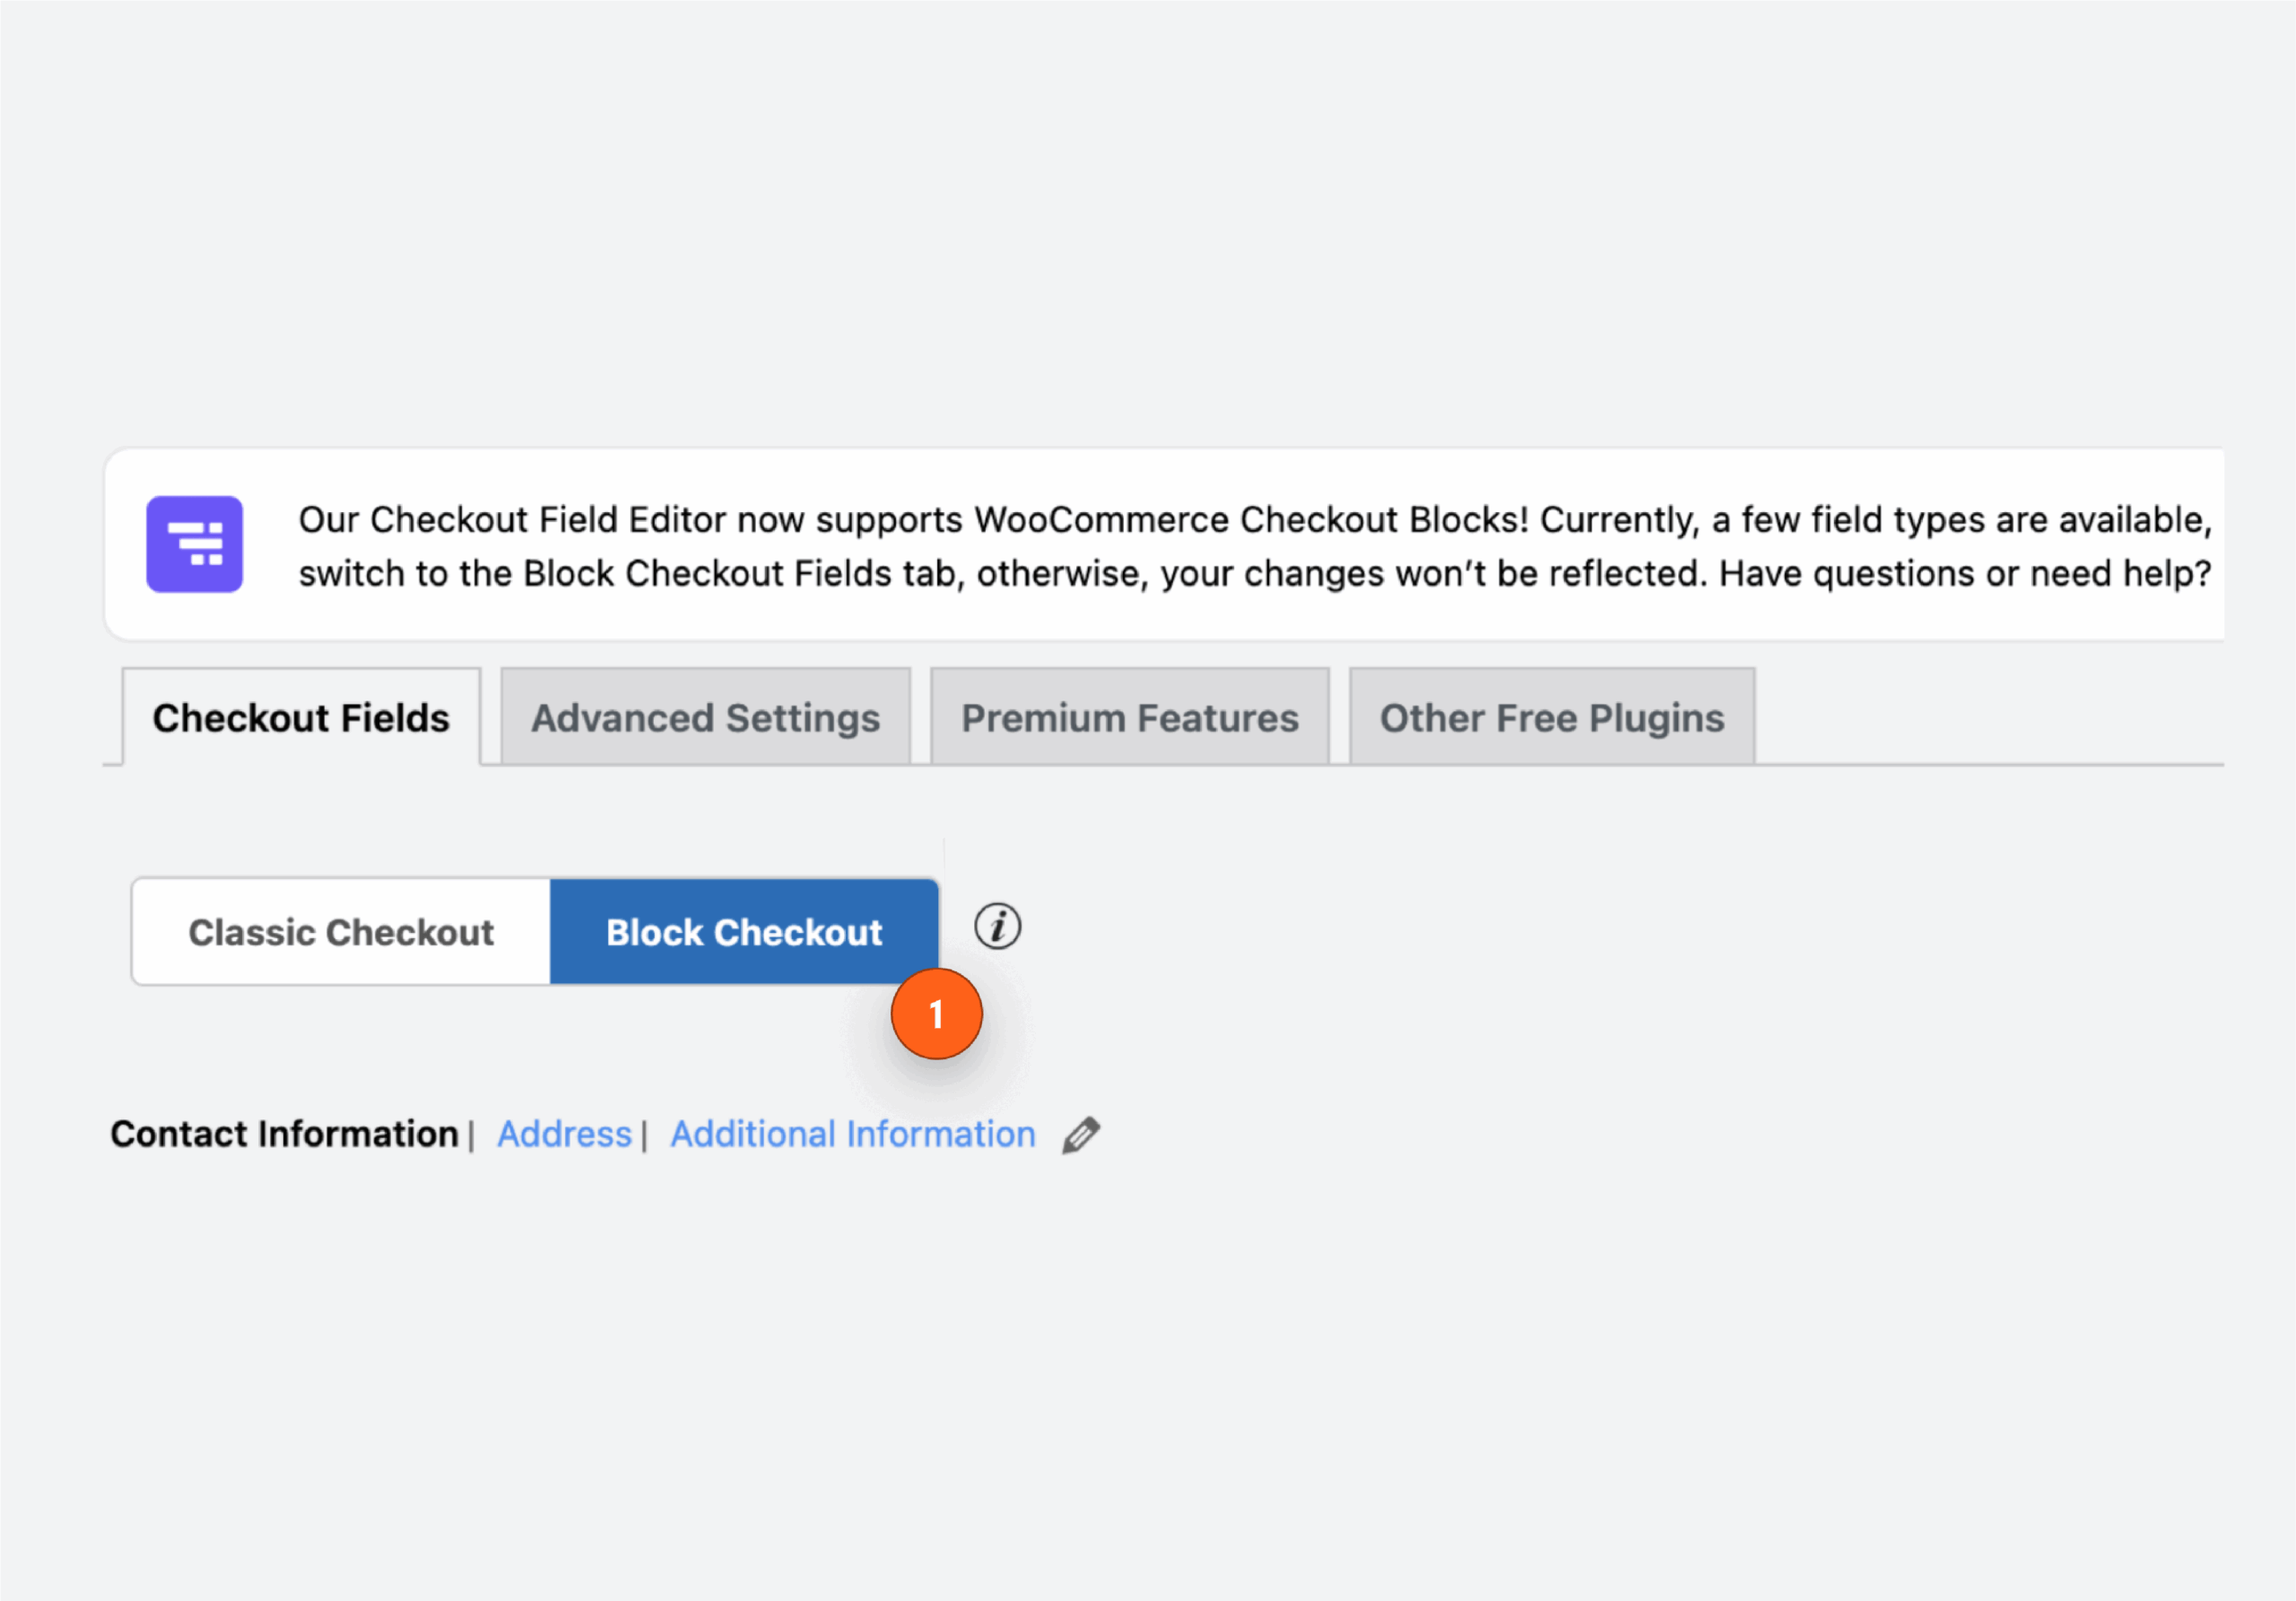
Just like before, the plugin handles rendering inside the Block checkout and should save data in an HPOS-safe way.
Method 2: Use WooCommerce Blocks extensibility APIs
When plugins can’t deliver what you need, WooCommerce’s Block extensibility APIs give you full control – but you’ll need JavaScript and React experience to use them.
The core concept is Slots and Fills. WooCommerce defines specific Slots throughout the Checkout block where you can inject custom React components. Your code registers a Fill that targets a slot, and WooCommerce renders your component in that location.
The general workflow:
- Create a React component for your custom field. This handles the UI, user input, and any client-side validation.
- Register your component as a Fill targeting the appropriate checkout slot, like
woocommerce_blocks_checkout_order_notes_blockfor the order section. - Access form values and checkout state through WooCommerce’s React context providers. These give you cart data, shipping info, and other checkout state your field might depend on.
- Implement validation by hooking into the checkout validation system. You can prevent submission and display errors if your field’s requirements aren’t met.
- Save submitted data by sending it to a PHP endpoint that uses
$order->update_meta_data()for HPOS compatibility. The JavaScript side passes data, while the PHP side persists it.
This approach is required for anything interactive or dynamic, like fields that update based on selections, real-time validation feedback, or custom UI elements that go beyond standard form inputs.
Where does ACF fit into block-based WooCommerce checkout?
ACF can’t render fields inside the Checkout block on its own. The Block checkout doesn’t process PHP template hooks or shortcodes – it’s a self-contained React application. So ACF’s usual method of displaying fields on the frontend doesn’t apply here.
That doesn’t make ACF useless for Block checkout stores. It’s extremely valuable for backend work: storing configuration options, building admin settings panels, or managing structured data that influences what appears at checkout. You might use ACF to let store admins define which custom fields should exist, what options a dropdown should contain, or which products trigger additional questions.
The pattern is to pair ACF with the Block extensibility APIs. ACF manages the data and admin interface. A custom JavaScript component reads that data (via REST API or localized script data) and renders the appropriate fields in the Checkout block. PHP handles saving the submitted values.
This split approach takes more setup than the all-in-one Classic checkout method, but it keeps your admin experience consistent while working within the Block checkout’s architecture.
WooCommerce custom checkout fields troubleshooting
If you’ve added custom fields using code or a plugin and something isn’t working, these are the most common issues and how to fix them:
- Custom fields not appearing on checkout usually means you’re using Classic checkout PHP hooks on a store running Block checkout. Switch to a Block-compatible plugin or rebuild your customization using the WooCommerce Blocks extensibility APIs.
- Field data that disappears after order submission typically results from saving methods that aren’t compatible with High-Performance Order Storage. Update your code to use
$order->update_meta_data()instead ofupdate_post_meta(), or verify your plugin explicitly lists HPOS support. - Unexpected errors or broken checkout layouts in Block checkout often point to plugin or theme conflicts because the strict JavaScript architecture surfaces incompatibilities that Classic checkout might tolerate. Disable other plugins one by one to isolate the problem, and test with a default theme like Storefront to rule out theme issues.
Troubleshooting Block checkout problems that you can’t pin down gets easier if you temporarily switch back to Classic checkout to see whether the issue is Block-specific. If your fields work on Classic but fail on Block, the problem is compatibility rather than your field configuration.
Deliver conversion-driven checkout flows with ACF
Getting checkout customization right starts with one question: Are you running Classic checkout or Block checkout? That choice determines everything else.
Classic checkout uses PHP hooks and template overrides. Block checkout requires React components and JavaScript APIs.
The methods aren’t interchangeable, and mixing them up is the most common source of problems.
Whichever path you’re on, save custom field data using $order->update_meta_data() to stay compatible with HPOS. This used to be optional, but now it’s the only way WooCommerce handles order data.
Once you’ve matched your approach to your checkout type, the next challenge is keeping things manageable. Conditional fields, product-specific questions, admin-configurable options – complexity adds up fast.
ACF gives you a structured way to handle that complexity.
You define field groups and metadata in a visual interface, then connect them to your checkout through code or Block APIs. As your store grows and checkout requirements change, you’re editing field settings rather than rewriting PHP or JavaScript.
Download ACF and start building checkout forms that scale with your business.
For plugin support, please contact our support team directly, as comments aren't actively monitored.